


Bloomers! Oh, how I have missed you. Before I get into my post, I just wanted to take a second to somewhat explain my absence. Over the past few months, I've been fighting through some personal hardships. I need some time to care for myself and get back to the things I love, and the thing I love most is this blog and all of you guys. I'm slowly getting back into the swing of things <3 That being said....
Just like every other fashionista, I love a good pair of shoes, and definitely when they're a bargain. Here in CT, we have this heaven sent blow out sale that relocates from town to town. It's basically like a mobile Marshalls or TJ Maxx. Every time I go, I b-line it straight to the shoe section. This past time, I got so lucky with my finds and I just couldn't wait to share with you, so here we go!


BLAKE LIVELY TO PRESERVE AMERICAN ARTISANS
posted on: Thursday, September 11, 2014
Vogue's August 2014 issue took me by surprise when I saw a very southwestern Blake Lively on the cover. While reading this spread on the Hollywood star, I found out that she recently launched a lifestyle website called Preserve.
SUNFLOWERS AND SUN SHOWERS
posted on: Tuesday, September 2, 2014


Last week Michael and I went up to Lyman Orchards to the the sunflower maze. It was such a bright and warm day! The amount of sunflowers really amazed me. Not only did the flowers themselves make an impression, but watching all of the bees and bugs collecting nectar was entrancing. It's like they were too busy to ever bother the people walking through. Overall it was beautiful and a great thing to do on a nice afternoon!
<3 Amy
FALL INSPO: LEATHER + KNITS
posted on: Tuesday, August 12, 2014
I'm sure you're all feeling the fall fever as much as I am. Around this time of year, I always find myself wishing away the heat and longing for chilly days wrapped in cozy sweaters, spent pumpkin picking, or at my favorite fairs. Autumn style is something I love because it lets me mix my love for leather and all things soft. These pieces are things I hope to make staples in my fall wardrobe.

1.) Silence and Noise Marled Open-Stitch Sweater - Not only am I in love with the colors this comes in, but I'm a sucker for open stitch. Whether I'd want to layer this over a dress or a patterned button up clean finished with a collar, it's super versatile.
2.) Jakimac Single Chain Draped Leather Harness - I have never owned a harness before, but when I found Jakimac, I fell in love with their pieces and the way they style them. I'd love to edge up a cute sweater dress with this! Follow them on instagram to see their styling and get inspired!
3.) Free People Side by Side Pullover - How cozy does this look?! Paired with some ripped denim and killer boots, this could effortlessly turn into a go-to look.
4.) Free People Top of The World Thigh Hi - Ribbed thigh high socks are a must for me in the fall months. I love them peeking out of a midi boot, or letting them shine with a pair of oxfords or ankle boots.
5.) Cooperative Oliver Structured Backpack - I always switch up my backpacks with the seasons. The fall semester is near and I need something thats cute but functional. I love this clean and classic look. The navy and leather straps are what drew me to this beauty!
6.) Modern Vice "Rita" Boot - I'm still in awe of how perfect these are. I definitely see myself pairing these with tights and a softer more feminine dress and chunky cardigan.
<3 Amy
RASPBERRY CHOCOLATE MALT CHEESECAKE
posted on: Wednesday, July 30, 2014
Every year for Danny's birthday I bake something new, but it always includes his three favorites: raspberry, malt, and chocolate. To celebrate his birthday this year I decided to make a raspberry chocolate malt cheesecake! I took a NY cheesecake family recipe and modified it to add malt and raspberry. For me baking is like fashion because all the colors are so appealing, and when something looks AND tastes good then it's in harmony.
So here's a peak at the finished product! For those of you who love these ingredients then try this recipe!


Raspberry Chocolate Malt Cheesecake
Bake 325 F for 1 hour ad 5 minutes
Ingredients-
Base:
1 1/2 cups crushed vanilla Oreos
1 1/2 cups crushed malted milk balls
1 tbsp. sugar
4 tbsp. butter (melted)
Filling:
5 packages of 8 oz. cream cheese (softened)
1 cup sugar
3 tbsp. flour
1 tbsp. vanilla
1 cup sour cream
4 eggs
3 cups roughly chopped malted milk balls
1 cup pureed frozen raspberries
Directions-
Base:
Take a generous handful of vanilla Oreos and place into a gallon size ziplock bag. Make sure the bag is tightly sealed. Use a rolling pin to roll over the cookie pieces until they become crushed. Measure and place into mixing bowl. Use a hand or electro generated turbo chopper to crush malted milk balls until crushed. Measure and add to mixing bowl. Add sugar and melted butter. Mix until all ingredients are well incorporated with butter. Using a 9 inch springform pan, dump crumbs into the bottom of the pan and press down using a spatula. Place in oven for 10 minutes at 325 F.
Filling:
Roughly chop up 3 cups of malted milk balls using the same turbo or hand chopper. Set aside. Puree (chopper will even do the job!) frozen raspberries and measure out 1 cup. Set aside. Beat cream cheese, 1 cup sugar, flour, and vanilla. Add sour cream and mix well. Then, put mixer on low speed and add eggs one at a time until blended. Keeping mixer on low speed, add in roughly chopped malted milk balls. Let the malted milk balls fold into cheese mixer and then turn off mixer being careful not to over mix. Pour the cheesecake mixture over the crust. Using a spoon, drizzle raspberries on top of the cake. Then take a sharp tip knife and make a figure eight design through the raspberries. Let cake cook at 325 F for 1 hour and 5 minutes. Refridgerate for 4 hours or overnight.
Garnish with roughly chopped malted milk balls and enjoy!
<3 Annalise
SIMPLE SOUTHWESTERN
posted on: Wednesday, July 23, 2014
While I love the boho look of layering, I also love neutral simplicity that's highlighted with a bold pattern or texture. Put tea-stained lace, distressed denim, western boots, and some southwestern prints and I'm one happy girl. I wanted to show you Bloomers how a little goes a long way in making an outfit that accents on a certain style, while still being subtle. In addition, most of these items were either thrifted or on sale proving that you can fill your wardrobe with the things you love at an affordable price! You just have to get out there and find it while spotting the potential in the item when you see it.
So here are 5 simple outfit inspirations! :

Poncho - Orvis
Dress - Thrifted in Madrid, Spain
Boots - thrifted

Dress - Free People
Hat - RVCA
Boots - Minnetonka

Denim Jacket - Thrifted
Lace Kimono Jacket - Band of Gypsies
Boots- Thrifted Justin Roper

Top - Free People
Bolo - Thrifted
Boots - Chippewa

Denim Jacket - Thrifted
Dress- Urban Oufitters
Belt - Urban Outfitters
Boots - Ecote
Have a great Wednesday :)!
<3 Annalise
EVERYDAY MAKEUP TIPS & TRICKS
posted on: Wednesday, July 16, 2014
Next to fashion, we love experimenting with different styles and brands of makeup. We have our traditional routines from day-to-day, but sometimes we like to change it up. From a different shade of eyeshadow to a new lipstick, we wanted to bring you two makeup styles that we wear often that we feel you can wear everyday. Summertime is our favorite for beachy locks and no makeup, but once in a while it feels nice to do a pop of liner or natural smokey eye. So here are our step-by-step instructions of two complete looks, and how you can get them!
Annalise // Natural Smokey Eye
When I'm looking for something other than a liner, I love going to a natural smokey eye because it is appropriate for day or night! I love neutral tones to warm up the farm and give a warm glow.
Products:

- Sephora Foundation Brush
- Clinique Blush Brush
- bareMinerals Flawless Application Face Brush
- bareMinerals Maximum Coverage Concealer Brush
- Hope In A Jar A to Z Cream in Light
- Covergirl Ready Set Gorgeous Concealer in Fair
- Laura Mercier Pressed Powder in Tender Rose
- Maybelline Fit Me Blush in Deep Coral
- bareMinerals Warmth Powder
- e.l.f. Eyebrow Brush
- e.l.f. Eyebrow Gel Shadow
- Benefit Creaseless Cream Shadow in RSVP
- Maybelline Eyeshadow Quad in Chai Latte
- Sephora Collection Kit
- Sephora Collection Kit
- Sephora Collection Kit
- Covergirl Perfect Blend Eye Pencil in Black Brown
- Maybelline Lash Stiletto in Very Black
- Revlon Lash Curler
Before:
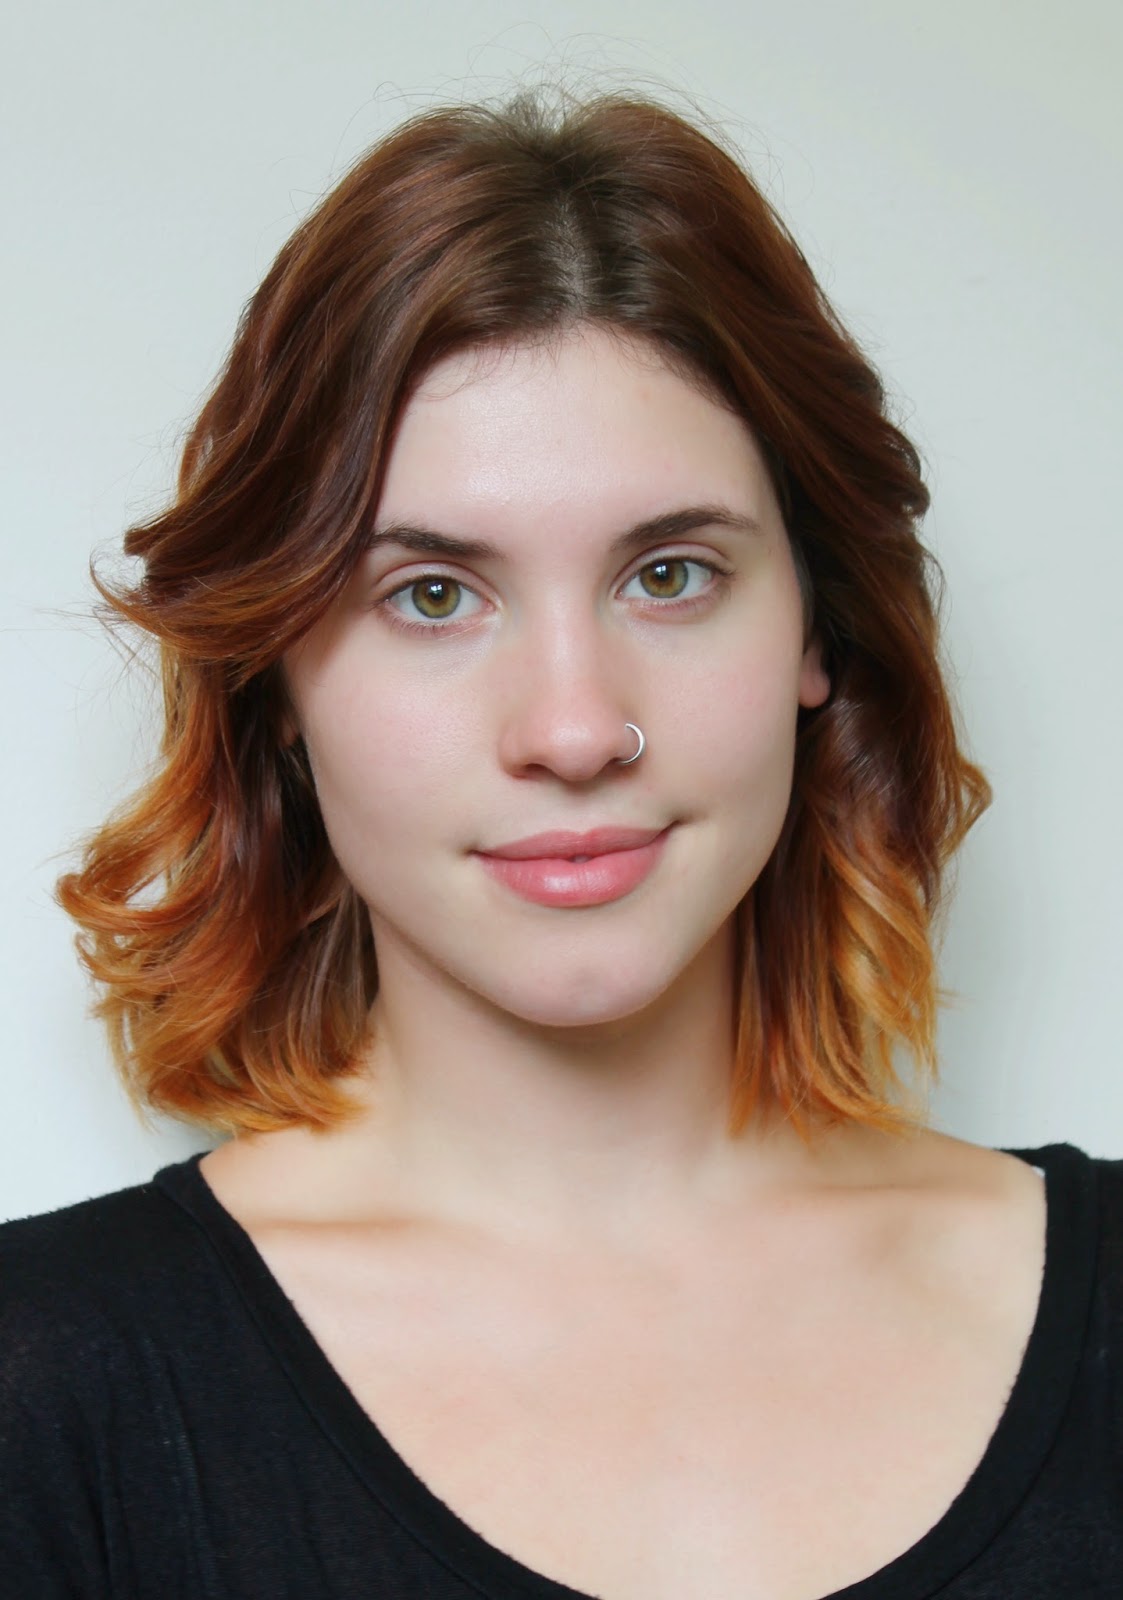
Step 1: All Over Coverage

- Apply two pumps of Hope in a Jar A to Z cream (#5) on to the back of your hand using it as a palette. Take the flat foundation brush (#1) and apply the tinted moisturizing cream using quick strokes blending down under your chin.
- Take a concealer brush (#4) and apply concealer underneath both eyes to blend into the A to Z cream.
- Use the full face brush (#3) to evenly apply the pressed powder (#7).
- Take the smaller face brush (#2) for both the warmth (#9) and blush (#8) and dust lightly underneath the cheekbones.
Step 2: Eyes

- First apply the cream shadow (#12) using your finger putting it all over the palette of your eye and into the crease.
- Using a soft shadow brush (#14), apply a light, neutral brown into the crease of your eye out towards the lid.
- Take a fuller brush (#15) and apply a golden brown shadow along the outside of the lid blending it into the previous color applied.
- Take a short blending brush (#16) and use it to apply an even lighter golden brown lining along the top of the lid and underneath along the bottom lashes to the crease.
- Take a dark brown eyeliner (#17) and draw a line from the outside of the top lid inward until about the middle of the eye. Do the same for the bottom lid.
- Once again, take the short blending brush and apply a dark brown shadow to the area where you marked the eyeliner making sure to blend the dark shadow up into the outside lid. Don't forget to do the same underneath the bottom lashes!
- Fill in eyebrows using a small, flat angled brush (#10) and a gel powder (#11).
- Take the concealer brush (#4) and use a light cream shadow to highlight under the eyebrow.
- Apply mascara (#18) and curl lashes (#19).
After:

Apply your desired lip color. I kept it neutral here with Clinque's Bamboo Pink!
Amy // Subtle Winged Liner
I usually change my look from day to day depending on my mood or my outfit. However, I always go back to my liquid liner for a bold but casual look. Something I hope every girl remembers is that it's not make up that makes us "pretty", it simply just enhances what we're lucky enough to already have!
Products:

- Bobbi Brown BB Cream in extra light
- Bobbi Brown Oil Free Tinted Moisturizer in extra light
- NYX Eyebrow Cake Powder in ash blonde
- Elf Blush in mellow mauve
- L'oreal Blackbuster liquid eyeliner
- Maybelline Master Drama eye liner in midnight master
- Milani Translucent Anti-Feathering lip liner
- Laura Mercier pressed powder in Tender Rose
- Make Up Forever Smoky Extravagant mascara
- Charlotte Ronson concealer (sadly discontinued)
- Full Powder Brush from BareMinerals
- Anastasia Beverly Hills Eyebrow brush from BareMinerals
- Watt's Up! Luminizer from Benefit
- Foundation Brush #56 Pro Flawless from Sephora
Before:

Step 1: Eyes and Brows

Having very, very light eyebrows is sometimes a challenge. I have a great full brow, just no color to enhance it! So, darkening them a bit but still keeping them light to play off my hair and skin tone is the perfect fix for me. Complimenting my eyes with a liner and mascara is an easy wearable style.
- The first thing I do is use my angled brush (#12). I lightly brush over the powder and apply it to my brows by following the natural direction of the hair and shape of the brow.
- After that I usually use the opposite end to brush the color through and lighten it up if need be.
- I use a Charlotte Ronson concealer (#10) directly under my eyes to brighten them up and hide any dark areas. Lightly cover the area and blend in with your fingers.
- For my liquid liner, I use L'oreal Blackbuster (#5). It's basically an eyeliner in marker form which makes it really easy to use. I start about 3/4 away from my inner corner and draw a line close to my lash line, following all the way through to my outer corner. Depending on how thick or long I want the wing to be, I usually do that part last with my eye open so I can judge the size
- I was blessed with curved lashes, so I skip the curling part and just apply my mascara to my top and bottom lashes. The one I use is from Makeup For Ever (#9).
Step 2: Face Coverage and Blush

Naturally I have very sensitive skin. So much as lightly touching it causes it to blemish. My face is also very red and has an uneven tone, which is why I love to use a tinted moisturizer to even out the color.
- Bobbi Brown makes my favorite face products. Her tinted moisturizer (#2) is my normal go to. I apply a small amount to the back of my hand, using it as a palette. With my foundation brush (#14) I apply it to my face in small quick strokes until I have covered my face evenly.
- Next I use my lightening stick (#13). This gets applied to my cheek bones in 2 small lines following the shape of my face and I blend it with my fingers. It just gives a subtle glow! Also in doing this, I thin out my tinted moisturizer allowing my freckles to show.
- To set everything and control a bit of shine from my moisturizer, I use my Laura Mercier pressed powder (#8).
- Last I do my blush. My favorite brand by far is Elf (#4). I use my full brush (#11) and apply the brush in circular motions while smiling, from the round of my cheekbone following through almost up to my hairline.
* The Bobbi Brown BB cream (#1) is what I use in the cooler months when heat and humidity isn't something that plays a part in how my make up sits on my face all day. It's a bit heaver than the tinted moisturizer because it has a foundation, moisturizer and sunscreen all in one. For someone who has normal or dry skin, this would work great all year round.
Step 3: Lips

Depending on where I'm going or what I'm wearing, my lip color always changes. Today I just picked a natural color called Dolce Carmello by Milani.
- Before I apply color, I always use my translucent anti-feathering lip liner (#7). It looks exactly like a liner except it's clear and made to keep color from leaking anywhere other than your lips. I line my lips with it and make sure to follow through all the way to the corners.
- This is where I apply my color! I wish I could say there was some secret to perfectly applying lipstick, but it's really just practice!
We hope you Bloomers find some makeup inspiration here! We embrace natural beauty, but also love being able to play around with products and highlight our favorite features. Let us know what your favorite products and methods are!

<3 Annalise & Amy
BRAINSTORMS FOR RAINSTORMS
posted on: Tuesday, July 15, 2014


Rain, rain, go away - We're in need of rain here in CT, but it bums us out a bit since that means less outfit photos. So today we headed to a local coffee shop to brainstorm for the upcoming weeks on BIB. We haven't gotten to take some time together and hang out in a while. It's hard living on almost opposite sides of the state, but to be honest we couldn't imagine not doing this together! Distance really doesn't matter, and at the end of the day we are so happy to have all you Bloomers feeling motivated and inspired because that's the reason why we are in this! We love spending time together being creative.
So get ready for some killer posts for the end of summer into fall fest season!
Some sneak peeks you can expect are:

We'd love to know what you Bloomers want to see! You guys are what make this all worth it. Please feel free to leave comments below about what you're interested in.
Have a great week!
<3 Amy & Annalise
FEATURE FRIDAY // RALPH LAUREN PRAIRIE EDITION
posted on: Friday, July 11, 2014

In my recent reading, I came across an article in Prairie Style magazine about Ralph Lauren being the "Prince of the Prairie." Although Ralph Lauren is most noted for his preppy, bold pieces, he is also celebrated for his American prairie style. Influenced by the American West, I can honestly say this is my favorite collection. Ralph Lauren's romantic prairie style was made popular in the eighties, but is still relevant today. In Prairie Style, they talk specifically about Ralph Lauren being the first fashion designer to have a complete home collection using the American West as its focal point. I couldn't resist not sharing these photos with you from the magazine! They're such an eye-catcher.


I truly love the nostalgic, rustic feel of Lauren's prairie style. It makes me want to buy a small farmhouse and garnish it in soft floral linens and Southwestern stripes.
His timeless decor also emphasizes his smaller collections of Southwestern garments. Check out secondhand stores or sites like Etsy and you are sure to find some killer vintage prairie pieces. However, Ralph Lauren still showcases the American West style on the runway and in classic collections from time to time. Take for example the Southwestern Beacon Print as part of Ralph Lauren's Classics. I love how he takes something full of tradition and history and finds a way to modernize it. The image below is taken from the Ralph Lauren website showcasing the Beacon Print.

If you have a chance to pick up the August 2014 Prairie Style issue, then I suggest you do! It's great being able to read and cherish a fashion and home decor leader, especially in his ability to celebrate American tradition.
<3 Annalise
WITHIN MY WALLS
posted on: Monday, June 30, 2014
Some of my favorite belongings are hanging on the walls of our apartment. I never get sick of looking at the paintings or prints on my wall, and they're the things that keep our place feeling customized and homey. I decided just to give you guys a little peak of my most precious wall hangings!


This is a print Michael and I got from a shop called Black Ink in Boston. Some people get a little weirded out when they first take a glance at this, but with good reason! Regardless, we love it and the fact that it's in French makes it more interesting and intriguing.
This is one of my most favorite painting ever! Annalise actually painted this for me as a Christmas present a few years back. She's so talented and this guy will proudly hang everywhere we ever move to.
Our good friend Danny, Annalise's boyfriend, painted this little flash sheet for us also as a Christmas gift. I am honestly in a state of never ending amazement when it comes to Danny's art. I feel honored to have a few of his original paintings! You guys all should check out his stuff here or here.
Okay, this print just makes me feel so warm inside. I've always thought that butterflies and moths hold a certain beauty (hence the one tattooed on my leg) so when I found this print at UO I knew I needed it.
These are two of Mike's paintings, both done by amazing tattoo artists. The smaller one is done by Josh Stephens (who I'm DYING to get tattooed by) and the larger one is by Mike Adams. I can look at these all day just soaking in the complex designs and admiring the detailing in their work.
One of the many things I love about our place in our little studio lights above our couch. It's like we have a little art gallery right in our own living room!
Michael and I really love our quaint little home, and I think in the future I may show you guys some more of it :)
Happy Tuesday, Bloomers!
<3 Amy
P.S. You guys may have realized that we have been a little MIA lately. We did not forget about you all, and our passion and love for BIB has not swayed a bit. We've just been very busy and challenged for time, but we're working our hardest to change that. Thank you to all of you guys who never leave our side <3
GRILLED PEACHES AND BERRIES
posted on: Monday, June 16, 2014

This past Father's Day, my mom, sister, and I decided to try out a bunch of new recipes that my mom has accumulated over time. With a day full of food and taste testing, I had to share one of the favorites that we made. These grilled peaches and berries were absolutely delicious. Talk about summertime in food form! I love that this recipe calls for cooking on the grill so that the house doesn't heat up with the oven on. We also added a scoop of vanilla bean ice cream, which gave this dish a cobbler taste.

It's funny because food is like fashion and interior design to me because it deals with color, presentation, and can inspire people! The difference is that we need food to nourish us, so it's great to find ways to incorporate healthy and vibrant foods into a dish. This recipe is perfect for that.

If you're interested in trying this recipe out then print the picture below! I made it recipe book friendly so that you can print it and store it for summers to come!

Enjoy :)
<3 Annalise